Arduinoから温湿度をツイートする方法

目次
使ったもの
Elegooと一緒に色々なモジュールが手に入るスターターキットを購入しました。
● Elegoo (Arduino 互換品) ¥3,550
ELEGOO Arduino用スターターキット レベルアップ チュートリアル付 mega2560 r3 nanoと互換
● Arduino イーサネットシールド2 ¥3,240
Arduino イーサネットシールド2: マイコン関連 秋月電子通商-電子部品・ネット通販
● 小型ACアダプター ¥1,500
UNIFIVE UNL110-1210(PL03B) 小型ACアダプター 12V1A センタープラス(内径φ2.1)
ツイートする
まずはArduinoから使用するアカウントのトークンを取得します。
以下のサイトにアクセスします。
arduino-tweet.appspot.com
トークンの役割についてはOAuth認証の仕組みをご確認ください。
一番分かりやすい OAuth の説明 - Qiita
1.トークンの取得
Get a token to post a message using OAuth. を左クリック。

Twitterのアカウント情報を入力して[Authrize app]を左クリック。

2. Stewitter ライブラリをインクルード
OAuth認証を使ってツイートを行う為にライブラリをインクルードします。
以下の記事を参考にしました。
Arduinoで遊ぼう - OAuthを使って安全につぶやくライブラリ「Stewitter」 - なんでも作っちゃう、かも。
以下のリポジトリにアクセスします。
github.com
[Download ZIP]を左クリック。

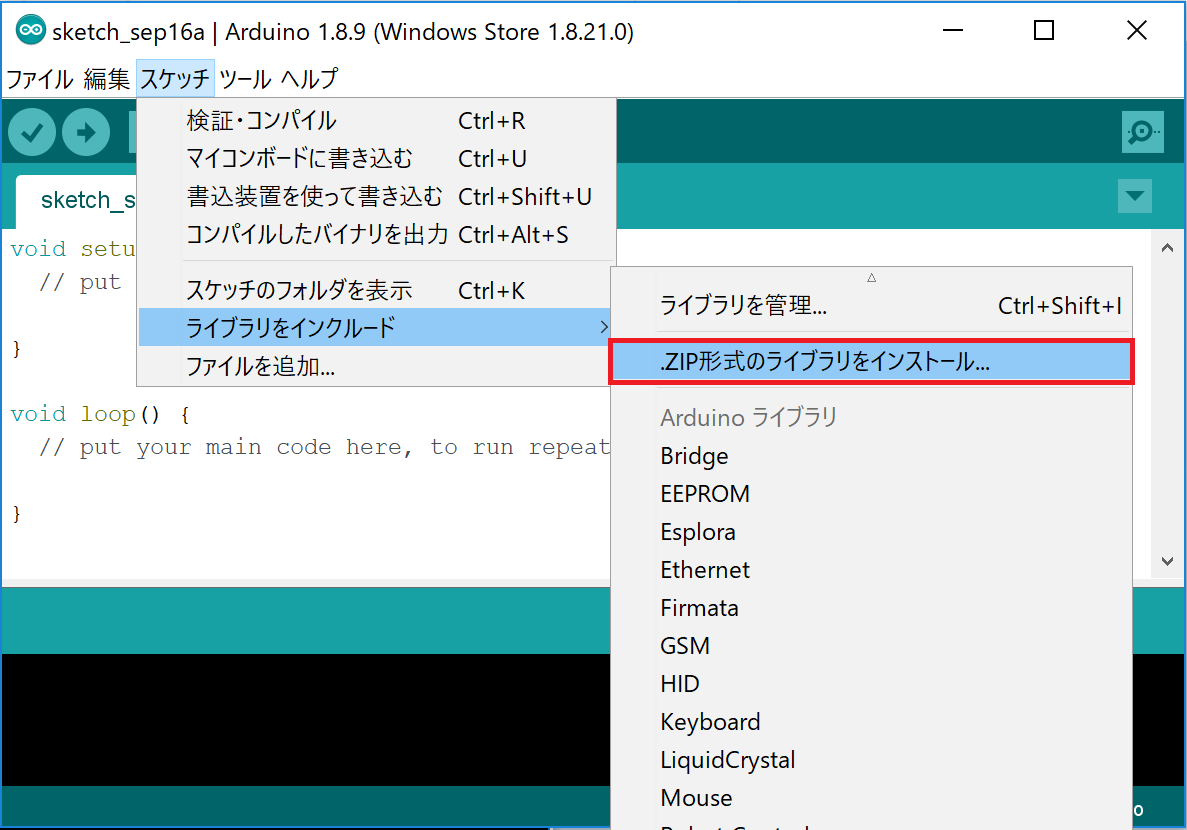
スケッチの[ZIP形式のライブラリをインストール]を左クリック。

ダウンロードしていたStewitterのライブラリを開いてインクルードします。

3. ソースコード
Tweet Library for Arduino にあるStep3のサンプルが動きませんでした。
変更点は Ethernet.begin(mac); でIPアドレスの指定を無くしています。
問題解決には以下の記事が参考になりました。
forum.arduino.cc
"Hello, World"とツイートします。
#if defined(ARDUINO) && ARDUINO > 18   // Arduino 0019 or later
#include <SPI.h>
#endif
#include <Ethernet.h>
#include <Twitter.h>

// Arduino イーサネットシールドのMACアドレス
byte mac[] = { 0x00, 0x00, 0x00, 0x00, 0x00, 0x00 };
// Tweet Library for Arduino で発行したトークンをYourTokenに入力
Twitter twitter("YourToken");

void setup() {
  // put your setup code here, to run once:
  Serial.begin(9600);
  Ethernet.begin(mac);
  String message = "Hello, World!";
  char* msg = message.c_str();
  Serial.print("connecting ...");
  if (twitter.post(msg)) {
    int status = 0;
    status = twitter.wait();
    if (status == 200) {
      Serial.println("OK.");
    } else {
      Serial.print("failed : code ");
      Serial.println(status);
    }
  } else {
    Serial.println("connection failed.");
  }
}

void loop() {
  // put your main code here, to run repeatedly:
}
温湿度を読み込む
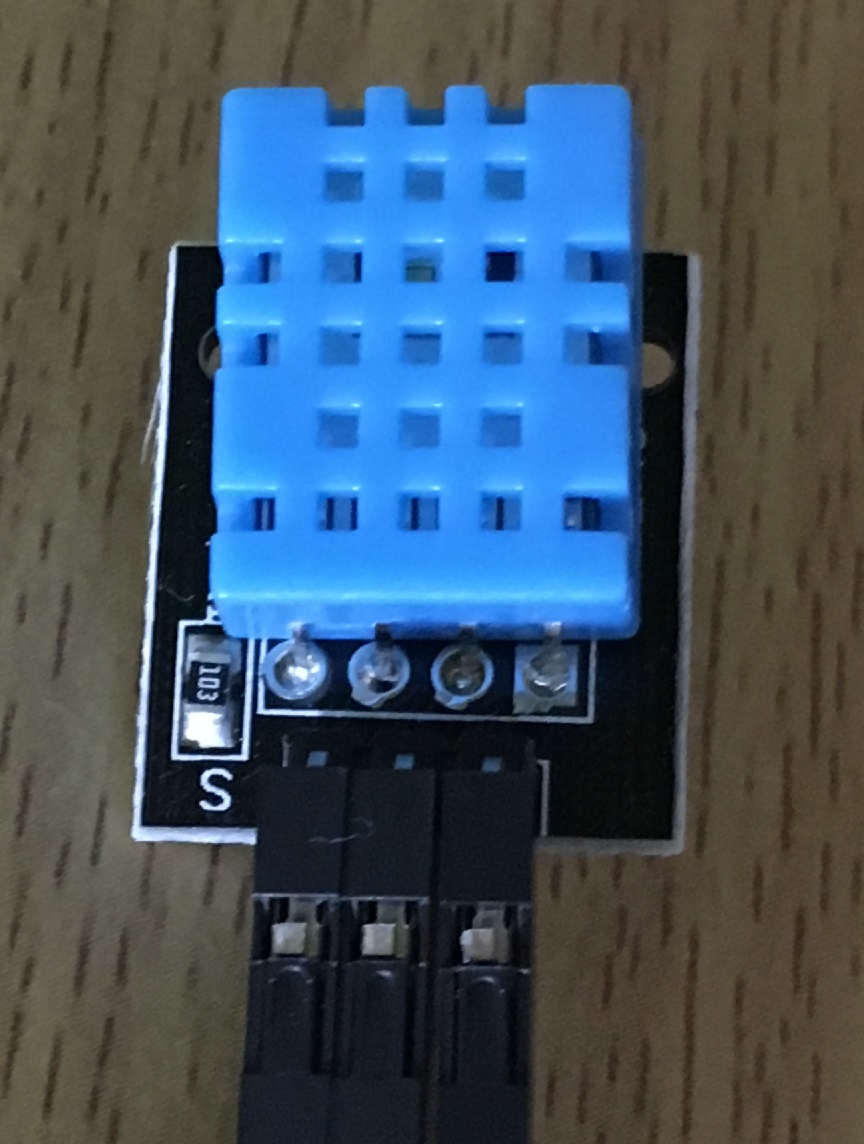
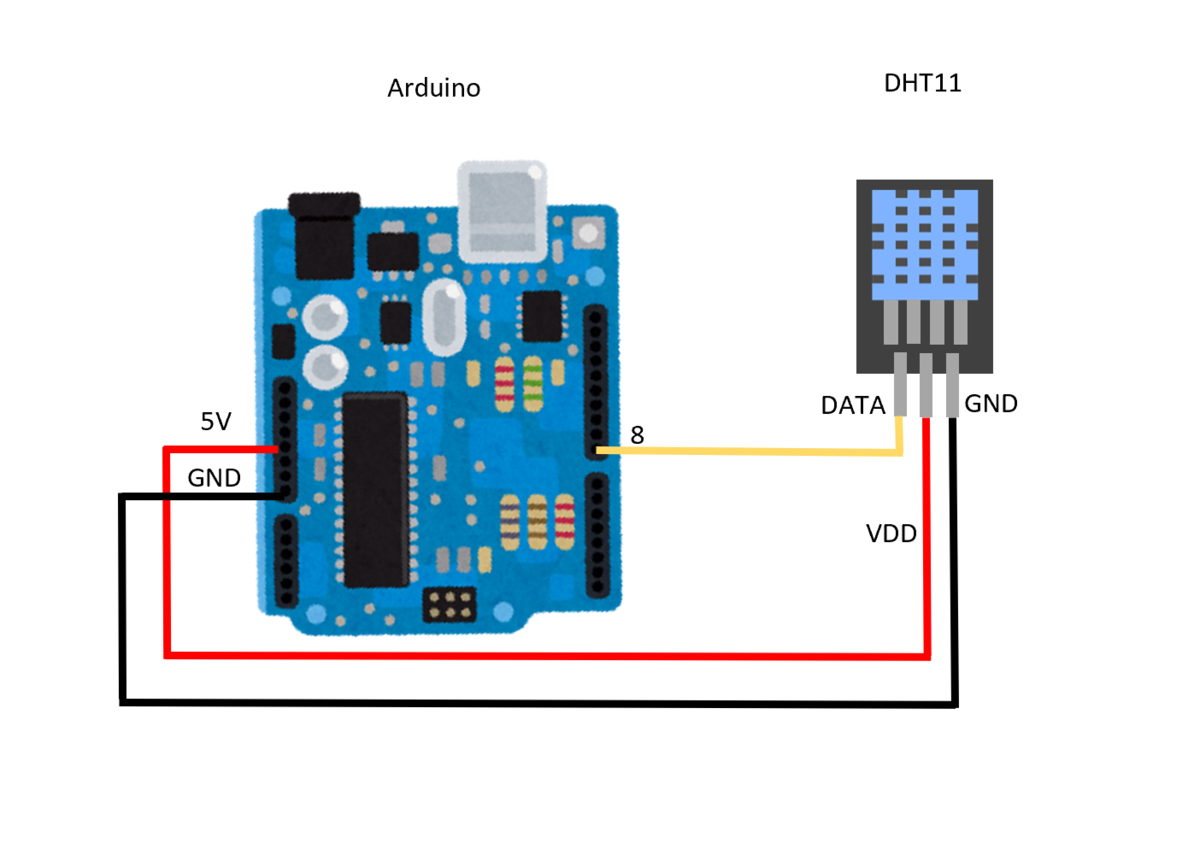
今回はスターターキットに付属していたDHT11を使用します。

2. DHT ライブラリのインクルード
スケッチの[ライブラリの管理]を左クリック。

DHT Sensor Library をインストールします。

3. ソースコード
湿度、温度、不快指数を出力します。
#include "DHT.h" //ライブラリインクルード
#define DHT_Pin 8 //DHT11のDATAピンを定義
#define DHT_Type DHT11 //センサの型番定義 DHT11,DHT22など

DHT dht(DHT_Pin, DHT_Type); //センサ初期化
float humidity = 0.0f; //湿度
float tempC = 0.0f; //摂氏温度
float discomfortIndex = 0.0f; //不快指数

void setup() {
  // put your setup code here, to run once:
  Serial.begin(9600);
  Serial.println("DHT11"); //画面に表示
  dht.begin(); //温湿度センサー開始
}

void loop() {
  // put your main code here, to run repeatedly:
  delay(2000); //2秒待つ データの読み出し周期1秒以上必要。
  humidity = dht.readHumidity(); //湿度の読み出し
  tempC = dht.readTemperature(); //温度の読み出し 摂氏
  /* 読み取れたかどうかのチェック */
  if (isnan(humidity) || isnan(tempC) || isnan(tempF)) {
  Serial.println("Read failure!");
  }
  /* 不快指数計算 */
  discomfortIndex = 0.81f * tempC + 0.01f * humidity * (0.99f * tempC - 14.3f) + 46.3f;
  /* 以下読み取り値の表示 */
  Serial.print("Humidity:" + String(humidity) + "%");
  Serial.print("Temperature:" + String(tempC) + "*C");
  Serial.print("Discomfort index:" + String(discomfortIndex));
}
4. 温湿度をツイートするソースコード
// Tweet
#if defined(ARDUINO) && ARDUINO > 18   // Arduino 0019 or later
#include <SPI.h>
#endif
#include <Ethernet.h>
#include <Twitter.h>
// 温度計
#include "DHT.h" //ライブラリインクルード
#define DHT_Pin 8 //DHT11のDATAピンを定義
#define DHT_Type DHT11 //センサの型番定義 DHT11,DHT22など
// Tweet
byte mac[] = { 0x00, 0x00, 0x00, 0x00, 0x00, 0x00 };
Twitter twitter("YourToken");
// 温度計
DHT dht(DHT_Pin, DHT_Type); //センサ初期化
float humidity = 0.0f; //湿度
float tempC = 0.0f; //摂氏温度
float discomfortIndex = 0.0f; //不快指数

void setup() {
  // put your setup code here, to run once:
  Serial.begin(9600);
  delay(1000);
  for(int i=5; i>0; i--)
  {
    Serial.println(i);
    delay(1000);
  }
  // 温度計
  Serial.println("DHT11"); //画面に表示
  dht.begin(); //温湿度センサー開始
  // Tweet
  Ethernet.begin(mac);
}

void loop() {
  // put your main code here, to run repeatedly:
  // 2分に1回ツイートする
  for(int i=0; i<2; i++)
  {
    delay(30000);
    Serial.println(i);
  }
  // 温度計
  delay(2000); //2秒待つ データの読み出し周期1秒以上必要。
  humidity = dht.readHumidity(); //湿度の読み出し
  tempC = dht.readTemperature(); //温度の読み出し 摂氏
  /* 読み取れたかどうかのチェック */
  if (isnan(humidity) || isnan(tempC) || isnan(tempF)) {
  Serial.println("Read failure!");
  }
  /* 不快指数計算 */
  discomfortIndex = 0.81f * tempC + 0.01f * humidity * (0.99f * tempC - 14.3f) + 46.3f;
  /* 以下読み取り値の表示 */
  Serial.print("Humidity:" + String(humidity) + "%");
  Serial.print("Temperature:" + String(tempC) + "*C");
  Serial.print("Discomfort index:" + String(discomfortIndex));
  // Tweet
  String message = "湿度: " + String(humidity) + "% %0D気温: " + String(tempC) + "°C %0D不快度指数: " + String(discomfortIndex);
  char* msg = message.c_str();
  Serial.print("connecting ...");
  if (twitter.post(msg)) {
    int status = 0;
    status = twitter.wait();
    if (status == 200) {
      Serial.println("OK.");
    } else {
      Serial.print("failed : code ");
      Serial.println(status);
    }
  } else {
    Serial.println("connection failed.");
  }
}


